Customer Vault
Add a hosted page for Customer Vault entries with Hosted Checkout's dynamic link method.
You can use Dynamic Checkout to add a hosted page for Customer Vault entries. Customer Vault tokenizes payment information and adds it to a customer profile. A hosted page lets customers save and edit their payment information in your Customer Vault. See Payment Method Storage for more on storing payment method information. This section provides instructions to create a vault-type hosted page through Maast Manager's Checkout feature and to set its configurations.
Prerequisites
- Follow the steps in Create a Sandbox Account to set up and log in to a merchant sandbox account in the Maast Manager portal.
- See Get Your API Credentials to generate and save your sandbox merchant ID and API security key. In the API access settings, be sure to enable Customer Vault (in addition to Checkout and Payment Gateway).
Implement
Create a Vault Profile
Follow these steps to create a vault-type Hosted Checkout profile, which will allow you to set up an associated hosted page:
- In your sandbox account, select 'Administration' in the left-hand menu.
- Under 'Account Configuration,' select 'Settings.'
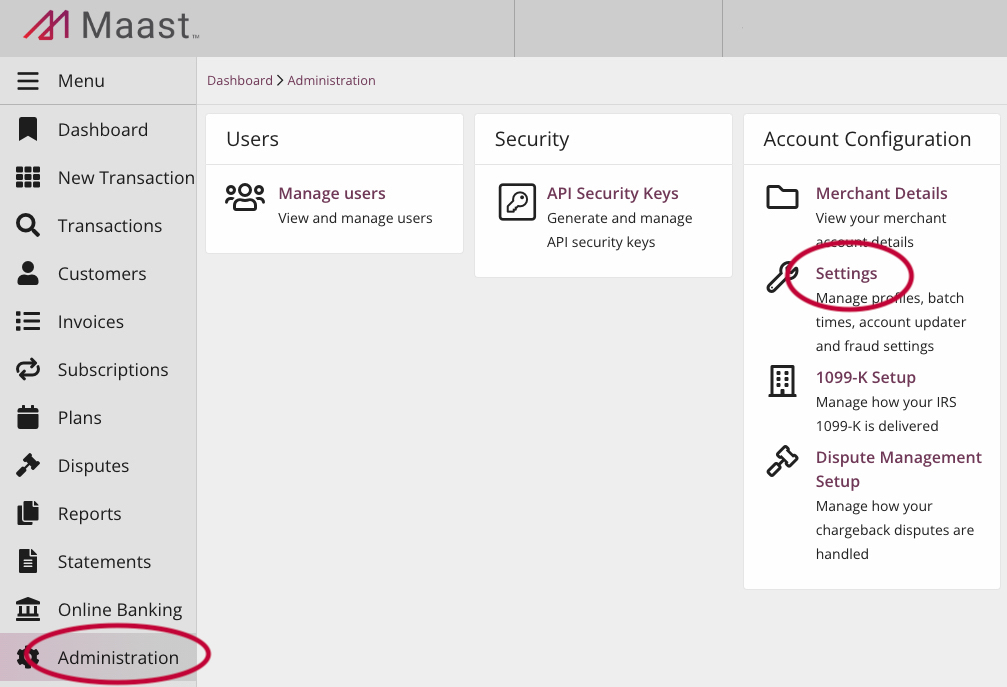
This takes you to merchant account settings:

- Select the 'Checkout' tab at the top.
This opens the Checkout configurations page:

- Select 'New Checkout Profile.'
This opens a form to create a new Checkout profile:

- In the 'Checkout Name' field, type a distinct name (preferably one you can distinguish from other links you create).
- Select 'Vault Profile.'
- Select 'Create Checkout Profile.'
This redirects you to the Hosted Checkout configurations page for your vault-type profile. See the instructions below to change the configurations for your profile on this page.
Access Settings
Follow these steps to access the configurable settings for your vault profile:
- Navigate to the Checkout configurations page by following steps 1-3 of 'Create a Vault Profile,' above.
- Below 'New Checkout Profile,' ensure that the desired profile is selected. To change profiles, click on the name below 'New Checkout Profile' and select from the drop-down menu that appears:

You are now on the Hosted Checkout configurations page for your profile and its associated hosted page. The instructions below guide you through setting your preferences in each section on the left side of the configurations page. The 'Preview' section on the right side shows how the hosted page will appear.
Save Changes
Changes in the 'Preview' section do not automatically save. Remember to select 'Save Changes' to set your configurations.
Edit the Vault Profile
The 'Edit Profile' section lets you view and edit the status and identifying information of your vault profile:
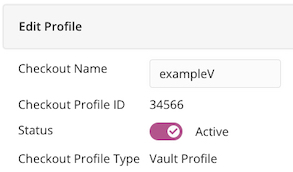
- Checkout Name - Type to edit the profile name.
- Checkout Profile ID - View the ID number of your vault-type profile. The API requires this if your account has multiple active profiles.
- Status - Toggle this to 'Active' to activate the profile. Toggle to 'Disabled' to disable the profile.
- Checkout Profile Type - View the profile type. This should say 'Vault Profile.'
Set Preferences
The 'Preferences' section lets you edit the function of your hosted page:
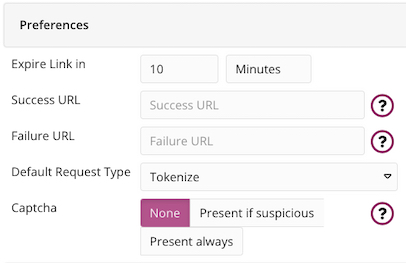
- Expire Link in - Type the length of time your hosted page's dynamic link should remain valid. Click on 'Minutes' to switch between minutes and days.
- Success URL - Your customer is sent to this page after a successful transaction.
- To send customers to the default Maast page, leave this field blank.
- To send customers to a custom URL, type the URL here. It must be formatted as
http://www.domain.com/orhttps://www.domain.com/
- Failure URL - Your customer is sent to this page after a failed transaction.
- To send customers to the default Maast page, leave this field blank.
- To send customers to a custom URL, type the URL here. It must be formatted as
http://www.domain.com/orhttps://www.domain.com/
- Default Request Type - Use the drop-down menu to choose between 'Tokenize' and 'Tokenize and Verify.'
- Tokenize - Tokenizes credit card or ACH payment information.
- Tokenize and Verify - Performs a verify request before tokenizing credit card information. Verification is restricted to credit cards, and fees may apply. If this is requested for an ACH payment, it only tokenizes the payment.
- Captcha - This controls the presence of a reCAPTCHA challenge on your page.
- Leave this set to 'None' to show no reCAPTCHA challenges.
- Select 'Present if Suspicious,' and a challenge will appear when a payment request is suspected to originate from a bot.
- Select 'Present Always' to show a challenge for every transaction.
Customize Page Introduction
The 'Page Introduction' section allows you to customize the appearance and wording at the top of your hosted page:
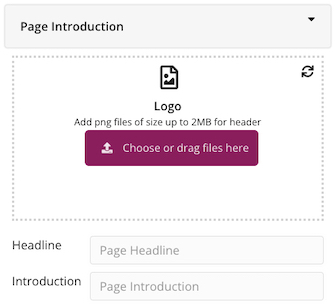
- Logo - Upload a header image to display on your hosted page.
- The image must be a PNG file of 2 MB or less.
- Drag the file into the 'Logo' space, or click 'Choose or drag files here' to select a file.
- Headline - Type a header to display at the top of your hosted page.
- Introduction - Type a subheader to display at the top of your hosted page.
Configure Personal Information Fields
The 'Personal Information' section lets you modify which identifying information to request or require of a customer:
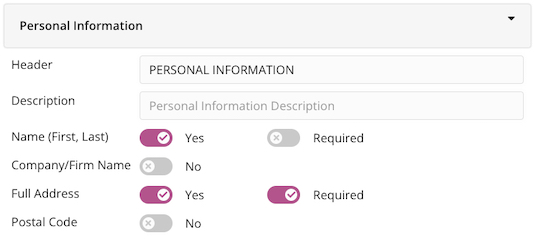
- Header - Type a header to display above the 'Personal Information' section on your hosted page.
- Description - Type a subheader to display above the 'Personal Information' section.
- The remaining options control which personal information fields you display and require on your hosted page. If set to 'Yes,' the field will show on the hosted page, and the 'Required' option appears in configurations. Select 'Required' to require that a customer enter this information:
- Name (First, Last)
- Company/Firm Name
- Full Address - You must require either 'Full Address' or 'Postal Code.' You cannot require both.
- Postal Code - You must require either 'Full Address' or 'Postal Code.' You cannot require both.
Configure Payment Settings
The 'Payment Settings' section lets you control payment type options and add a surcharge or convenience fee:
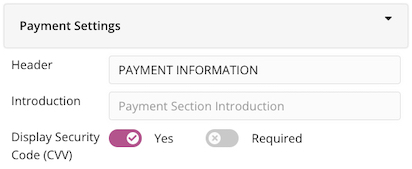
- Header - Type a header to display above the payment information fields on your hosted page.
- Introduction - Type a subheader to display above the payment information fields.
- Allow ACH Payment - Set this to 'Yes' to allow ACH payment information. If you do not see this option and are using USD, please contact Maast support to have your account enabled for ACH payments.
- ACH Payment Label - This appears when 'Allow ACH Payment' is set to 'Yes.'
- Choose how you would like to label the ACH payment option button on your hosted page: 'ACH,' 'eCheck,' or 'Bank Account.'
- This setting only changes what your customer sees. The option functions the same regardless, and Maast Manager refers to all ACH payments as 'ACH payments.'
- Display Security Code (CVV) - When set to 'Yes,' you can collect the security code (CVV) from your customer. This is recommended.
- When you select 'Yes,' the 'Required' option appears.
- Select 'Required' to require the payment card's CVV.
Remember to select 'Save Changes' to set your configurations. Changes in the 'Preview' section do not automatically save.
Integrate
Follow the steps in the Create a Checkout Link guide. Use your vault-type profile ID in the request's checkout_profile_id field.
Test and Go Live
See our Test and Go Live guide to test your Hosted Checkout integration and to start transacting with an active production account.
Updated over 1 year ago
