Permanent Link Method
Set up Hosted Checkout with the permanent link method.
The documentation on this page includes information on the Hosted Checkout permanent link method and instructions for setting it up. Use this method to securely and easily process transactions by redirecting customers to a hosted payments page and letting Maast do the rest.
Features
The permanent link method has the following benefits:
- Easy integration - No web development needed.
- Easy to set up - Create a link in Maast Manager and add it to your website, application, or invoice.
- Easy to manage - Send customers to a Checkout page hosted by Maast.
- Unique to you - Customize the appearance of your Checkout page.
- Secure - All cardholder data is collected and processed by Maast, a PCI DSS certified Level 1 compliant Service Provider.
The method supports these transaction types:
- Sale - Authorize and capture payment in a single message.
- Authorization - Send cardholder data to the issuing bank for approval.
It supports the following forms of payment:
- Visa
- Mastercard
- Discover
- American Express
- Google Pay™
- ACH
It supports these currencies:
- For credit card payments - All currencies supported by Mastercard and Visa
- For ACH payments - USD
It supports the following payment types:
- E-commerce
- Mail order
- Telephone order
The instructions below take you through setting up a permanent link for your Hosted Checkout page and customizing the page's appearance and function.
Create a Sandbox Account
See Create a Sandbox Account to set up and log in to a merchant sandbox account in Maast Merchant portal, which you will use to create your permanent link.
Create a Permanent Link
Follow these steps to generate a Checkout profile whose permanent link redirects customers to your Hosted Checkout page:
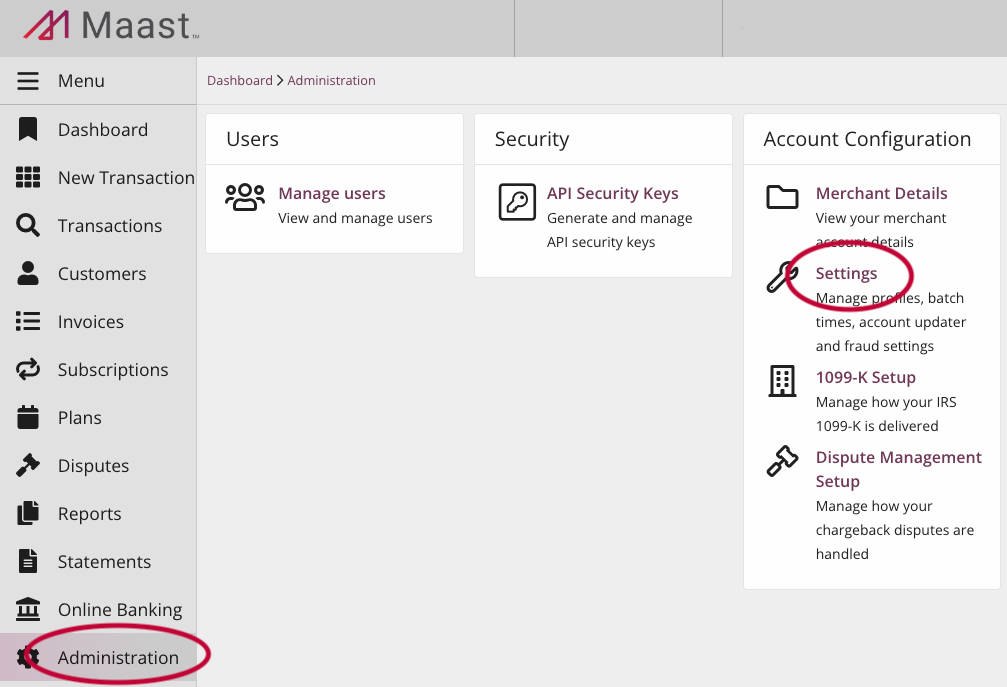
- While signed in to your merchant sandbox account, select 'Administration' in the left-hand menu.
- Under 'Account Configuration,' select 'Settings':
This takes you to merchant account settings:

- Select the 'Checkout' tab at the top.
This opens the Checkout configurations page:

- Select 'New Checkout Profile.'
This opens a form to create a new Checkout profile:
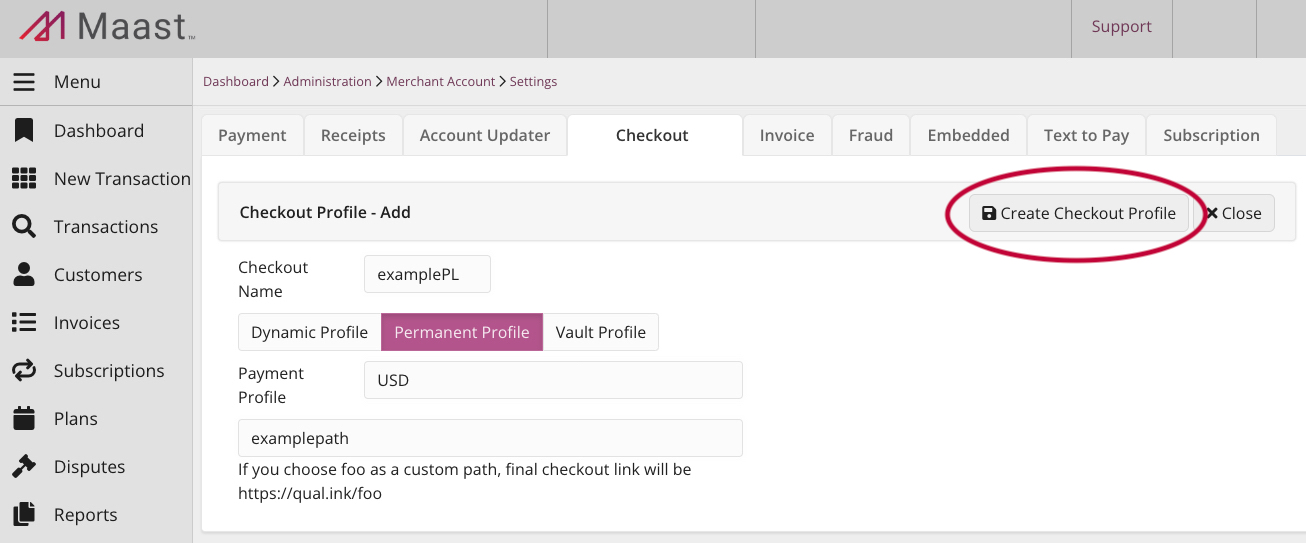
- In the 'Checkout Name' field, type a distinct name (preferably one you can distinguish from any other links you create).
- Select 'Permanent Profile.'
- Select your preferred currency.
- If you are using U.S. dollars (USD), you can elect to add a surcharge or convenience fee here. If you do not see this option, contact Maast Support at [email protected].
- ACH payment transactions require the 'USD' option. Your customer will not see the option for ACH payments if you choose one of the following: a non-USD currency, 'USD (With Surcharge),' or 'USD (With Convenience Fee).'
- Type a custom path for your link.
- Select 'Create Checkout Profile.'
You will be redirected to the 'Checkout' configurations page, where you can view and copy your permanent link:
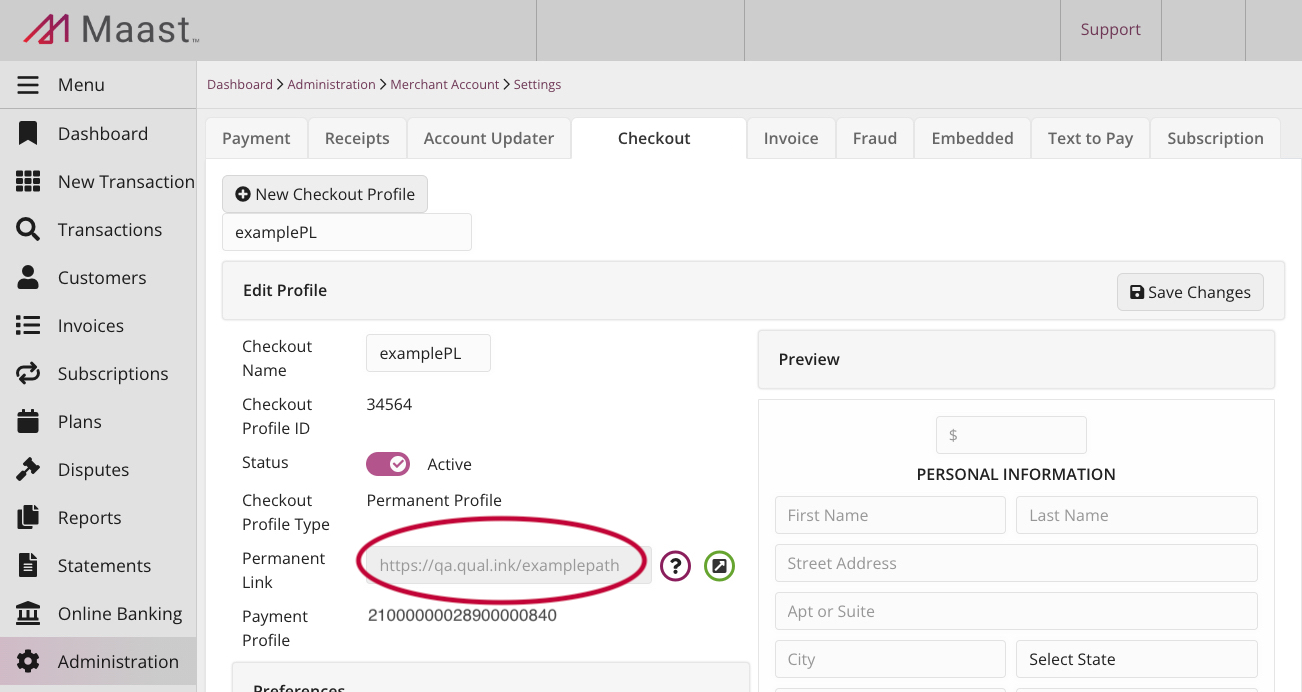
You can now follow the instructions below to configure your permanent link, or you can go straight to integrating and testing your permanent link with its default settings.
Configure Your Permanent Link
This section gives instructions to set the configurations for your permanent link Checkout profile. These configurations customize the appearance and function of your Hosted Checkout payment workflow.
Access Settings
Follow these steps to access the configurable settings for your Checkout profile:
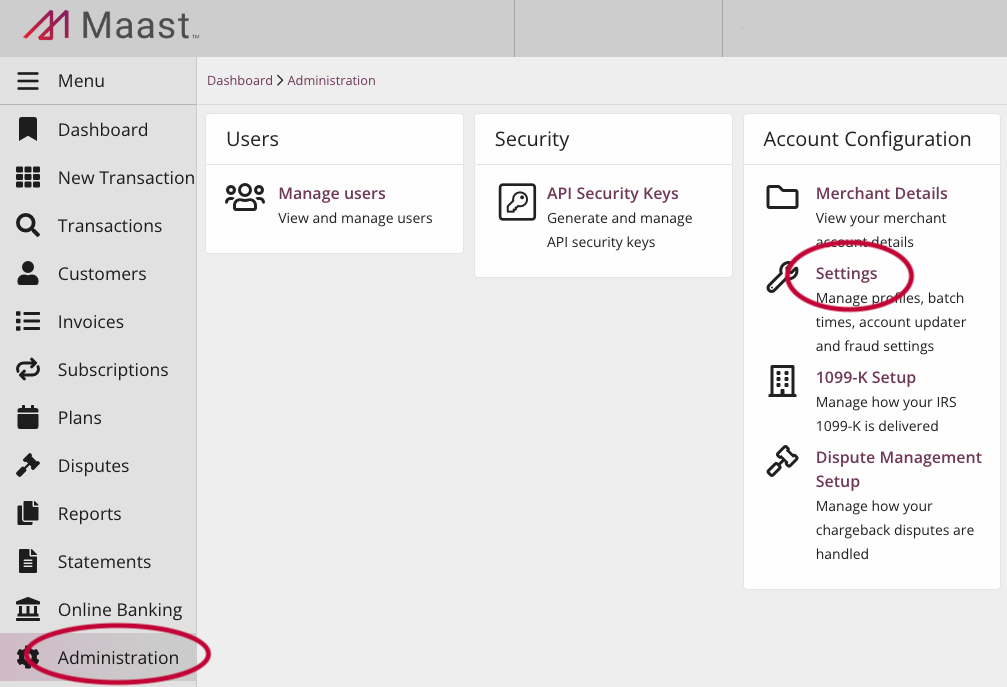
- In your Maast Merchant sandbox account, select 'Administration' in the left-hand menu.
- Under 'Account Configuration,' select 'Settings':
This takes you to merchant account settings:

- Select the 'Checkout' tab at the top.
This opens the Checkout configurations page:
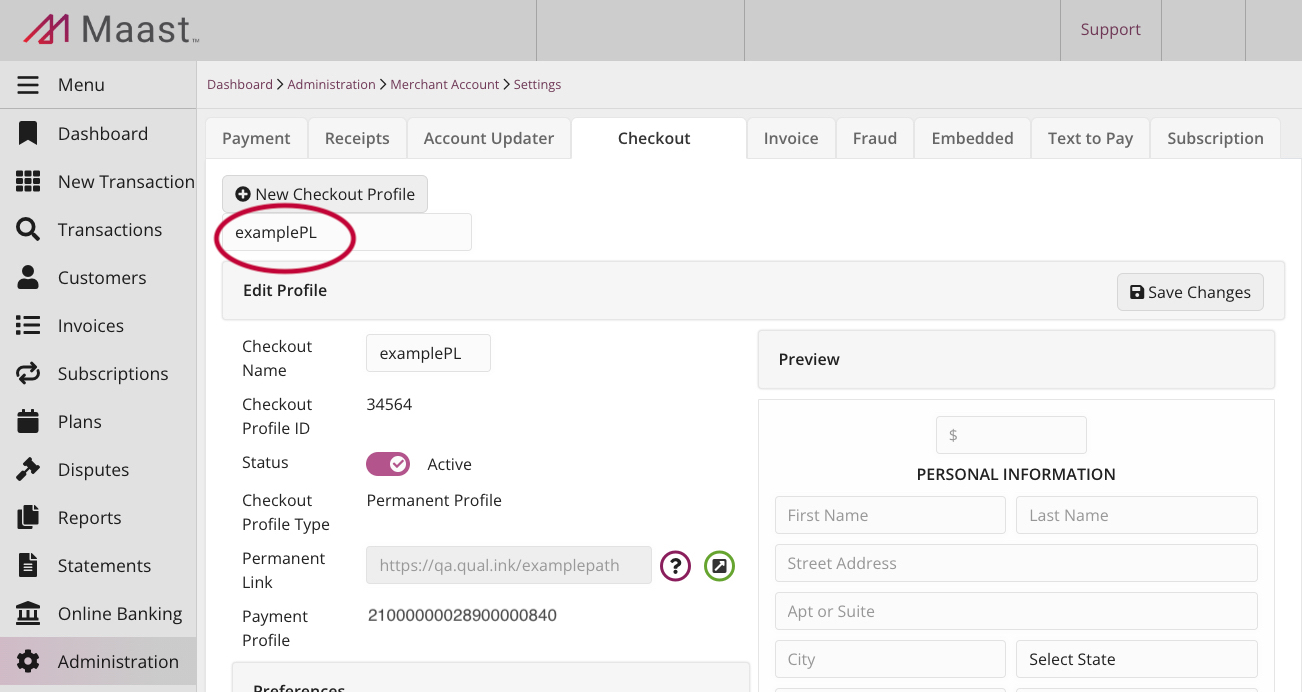
- Below 'New Checkout Profile,' ensure that the desired Checkout profile is selected. To change profiles, click on the name below 'New Checkout Profile' and select from the drop-down menu that appears.
You are now on the Hosted Checkout configurations page for your permanent link. The instructions below guide you through setting your preferences in each section on the left side of the configurations page. The 'Preview' section on the right shows what a customer will see.
Save Changes
Changes to Hosted Checkout configurations do not automatically save. Remember to select 'Save Changes' to set your configurations.
Edit the Checkout Profile
The 'Edit Profile' section lets you view and edit the status and identifying information of your Checkout profile:
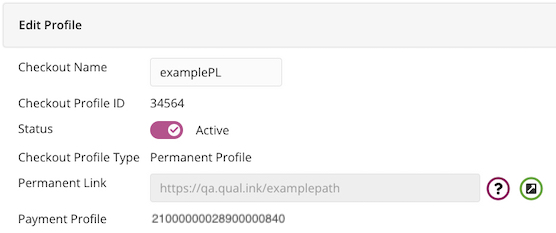
- Checkout Name - Type to edit the profile name.
- Checkout Profile ID - View the ID number of the Checkout profile.
- Status - Toggle this to 'Active' to activate the profile. Toggle to 'Disabled' to disable the profile.
- Checkout Profile Type - View the profile type. This should say 'Permanent Profile' for the permanent link method.
- Permanent Link - View the permanent link for this profile, and select the arrow icon on the right to open it in a new tab. You must contact Maast to change the permanent link's custom path.
- Payment Profile - View the ID number of the payment profile.
Set Preferences
The 'Preferences' section lets you edit the path of the payment workflow:
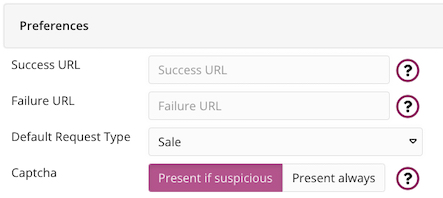
- Success URL - Your customer is sent to this page after a successful transaction.
- To send customers to the default Maast receipt page, leave this field blank.
- To send customers to a custom URL, type the URL here. It must be formatted as
http://www.domain.com/orhttps://www.domain.com/
- Failure URL - Your customer is sent to this page after a failed transaction.
- To send customers to the default Maast receipt page, leave this field blank.
- To send customers to a custom URL, type the URL here. It must be formatted as
http://www.domain.com/orhttps://www.domain.com/
- Default Request Type - Use the drop-down menu to choose between 'Sale' and 'Authorization Only.'
- You must select 'Sale' to support ACH payments.
- If you select 'Authorization Only,' you will need to capture transactions manually via Maast Manager or the Payment Gateway API.
- See this guide to capture transactions through Maast Manager.
- See Capture an Authorized Transaction to do so with the Payment Gateway API.
- Captcha - This controls the presence of a reCAPTCHA challenge on your Checkout page.
- Leave this set to 'Present if Suspicious,' and a challenge will appear when a payment request is suspected to originate from a bot.
- Select 'Present Always' to show a challenge for every transaction.
- Captcha's 'None' option is available for permanent links after Maast has approved your account. Select it to show no reCAPTCHA challenges. Please contact Maast support at [email protected] for this option.
Customize Page Introduction
The 'Page Introduction' section allows you to customize the appearance and wording at the top of your Checkout page:
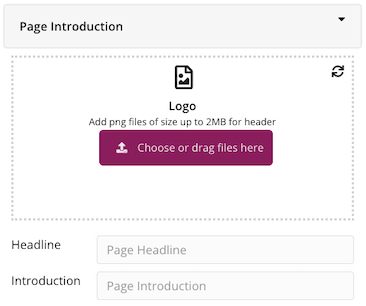
- Logo - Upload a header image to display on your Checkout page.
- The image must be a png file of 2 MB or less.
- Drag the file into the 'Logo' space or click 'Choose or drag files here' to select a file.
- Headline - Type a header to display at the top of your Checkout page.
- Introduction - Type a subheader to display at the top of your Checkout page.
Set Payment Amount and Frequency Options
The 'Amount & Frequency' section controls a customer's options for the amount and frequency of their payment and the use of a purchase ID:
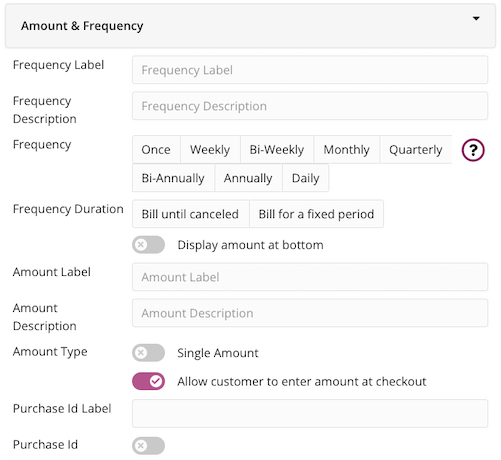
- Frequency Label - Type a header to display above your optional frequency buttons.
- Frequency Description - Type a subheader to display above your optional frequency buttons.
- Frequency - You can select one or more buttons.
- Each highlighted button will appear on your Checkout page for a customer to choose that frequency of payment.
- If you select one or more frequency buttons, you must require 'Name' or 'Company/Firm Name' in the 'Personal Information' section.
- Frequency Duration - If you have selected one or more frequency buttons above, you must select whether you will 'Bill until canceled' or 'Bill for a fixed period.' If you select 'Bill for a fixed period,' you are prompted to enter the number of billing cycles for which you wish to bill. Type or use the arrows in the text box to enter the number of billing cycles.
- Display amount at bottom - If toggled 'off,' payment amount fields appear above the 'Personal Information' fields on your Checkout page. If toggled 'on,' they appear below the 'Personal Information' fields.
- Amount Label - Type a header to display above the payment amount options on your Checkout page.
- Amount Description - Type a subheader to display above the payment amount options on your Checkout page.
- Amount Type - This has several options:
- Allow customer to enter amount at checkout - This is the default option. The customer may enter the payment amount, and you do not provide set amounts.
- Single Amount - This charges one preset amount.
- To choose this, deselect 'Allow customer to enter amount at checkout' and leave 'Single Amount' deselected.
- Type into the 'Amount' prompt that appears.
- Multiple-Choice Amount - Shows a list of preset amounts for your customer to select.
- To choose this, click 'Single Amount.' The toggle is highlighted and displays 'Multiple-Choice Amount.'
- Type into the 'Amount' prompt that appears, then press Enter or select 'Add Amount.' You can add several amounts this way.
- Remove an amount with its black 'X' icon.
- Other Amount Option - Appears when you have entered at least one preset amount under the 'Multiple-Choice Amount' setting. Toggle this to 'Yes' to display an 'Other' button on your Checkout page, which a customer may select to enter their preferred amount.
- Purchase ID Label - Type a header to display above the purchase ID field on your Checkout page. This will only display if you elect to use the purchase ID field.
- Purchase ID - Select this to use the purchase ID field on your Checkout page.
- You can use this to request something that will make sense to your workflow, like invoice number or account number.
- A purchase ID may be no more than 25 characters.
- This value will be included in Maast reports.
- When 'Purchase ID' is on, the 'Required' prompt appears. Toggle it to choose whether to require a purchase ID input.
Configure Personal Information Fields
The 'Personal Information' section lets you modify which identifying information you request or require of a customer:
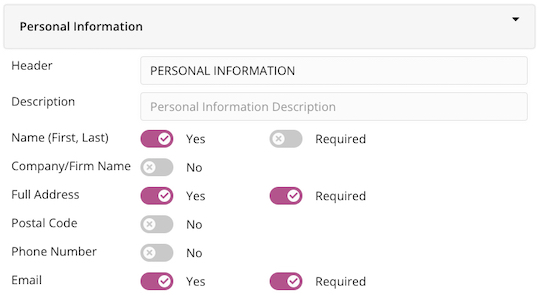
- Header - Type a header to display above the personal information section on your Checkout page.
- Description - Type a subheader to display above the 'Personal Information' section on your Checkout page.
- The remaining options control which personal information fields you display and require on your Checkout page. If set to 'Yes,' the field will show on the Checkout page, and the 'Required' option appears in configurations. Select 'Required' to require that a customer enter this information:
- Name (First, Last)- You must require 'Name' or 'Company/Firm Name' to use any of the billing frequency options.
- Company/Firm Name
- Full Address - You may enable either 'Full Address' or 'Postal Code,' but not both.
- Postal Code
- Phone Number
Add Optional Fields
The 'Option Field' section lets you request or require further information from a customer:
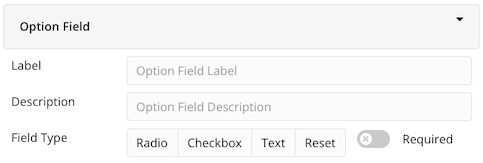
- Label - Type a header to display above the optional fields on your Checkout page.
- Description - Type a subheader to display above the optional fields on your Checkout page.
- Field Type - This has multiple options:
- Radio - This displays preset options, and the customer can choose only one.
- Select 'Radio,' and the 'Field Type Options' prompt appears.
- Type into the 'Field Type Options' prompt, then press Enter or click on the '+' sign next to the prompt. You can add several options this way.
- Remove an option by clicking its black 'X' icon.
- Select 'Required' to require the customer to choose an option.
- Checkbox - This displays preset options, and the customer can make multiple selections.
- Select 'Checkbox,' and the 'Field Type Options' prompt appears.
- Type into the prompt, and press Enter or click on the '+' sign next to the prompt. You can add several options this way.
- Remove an option by clicking its black 'X' icon.
- Select 'Required' to require the customer to choose an option.
- Text - This allows the customer to type an input. Select 'Required' to require the customer to enter something here.
- Reset - Select this to remove the optional fields from your Checkout page.
- Radio - This displays preset options, and the customer can choose only one.
Configure Payment Settings
The 'Payment Settings' section lets you control payment type options and add a surcharge or convenience fee:
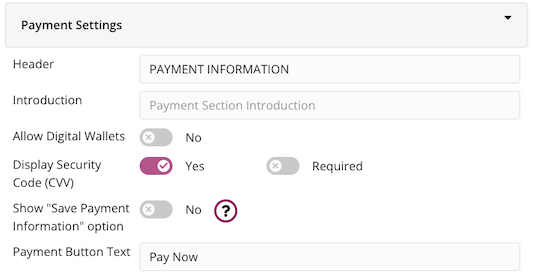
- Header - Type a header to display above the payment information fields on your Checkout page.
- Introduction - Type a subheader to display above the payment information fields on your Checkout page.
- Allow Digital Wallets - Set this to 'Yes' to allow payments from digital wallets. When this is enabled, a toggle will appear to select whether to accept Google Pay.
- Allow ACH Payment - Set this to 'Yes' to allow ACH payments. If you do not see this option and are using USD, please contact Maast support to have your account enabled for ACH payments.
- ACH Payment Label - This appears when 'Allow ACH Payment' is set to 'Yes.'
- Choose how you would like to label the ACH payment option button on your Checkout page: 'ACH,' 'eCheck,' or 'Bank Account.'
- This setting only changes what your customer sees. The option functions the same regardless, and 'Maast Manager' refers to all ACH payments as 'ACH payments.'
- Display Security Code (CVV) - When set to 'Yes,' you can collect the security code (CVV) from your customer (recommended).
- When you select 'Yes,' the 'Required' option appears.
- Select 'Required' to require the payment card's CVV.
- Show 'Save Payment Information' option - This is not available if you are using the permanent link method. Selecting it will not display the option on your Checkout page.
- Add Fee Recovery - Set this to 'Yes' to add a surcharge (to cover your processing costs) or a convenience fee (to cover the costs of accepting a transaction from a non-customary channel).
- Payment Button Text - Type the text you would like to show on the submit button, such as 'Donate Now' or 'Buy Now.'
Remember to select 'Save Changes' to set your configurations. Changes to Hosted Checkout configurations do not automatically save.
Integrate
Perform these steps to integrate Hosted Checkout with the permanent link method:
- Follow the instructions in Access Settings to go to the Checkout configurations page in your sandbox account:
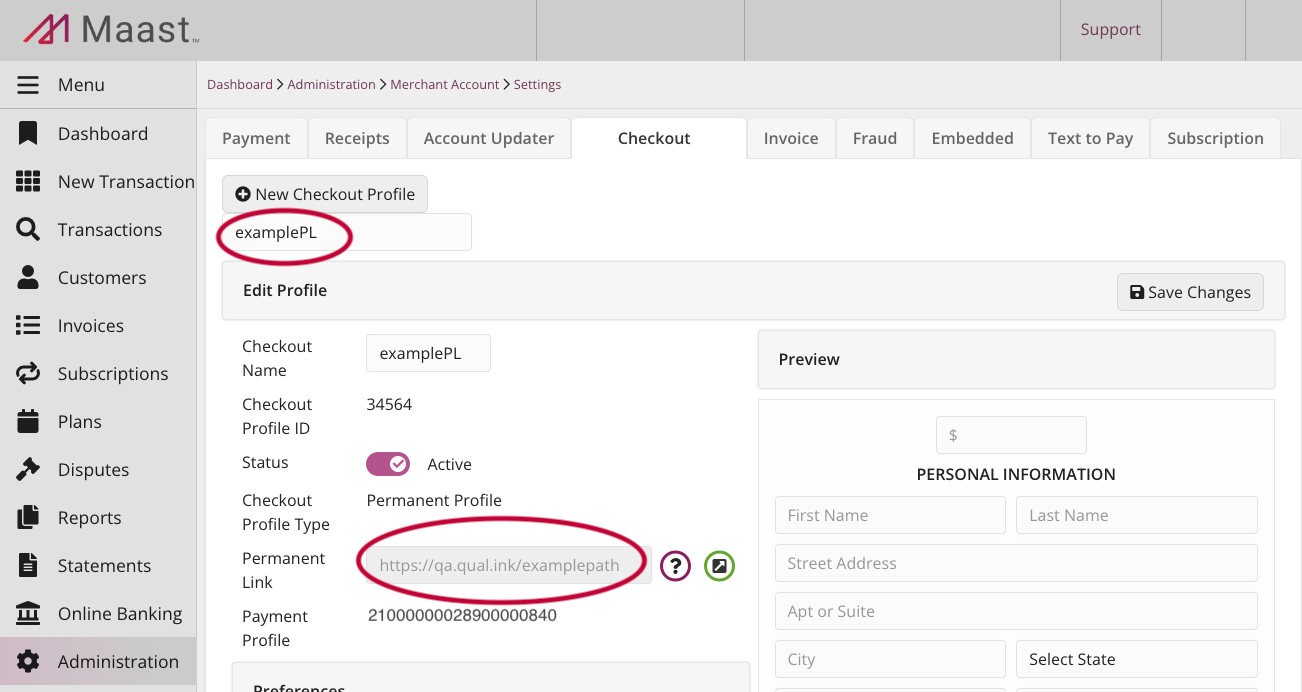
- Below 'New Checkout Profile,' ensure that the desired permanent Checkout profile is selected. To change profiles, click the profile name below 'New Checkout Profile' and select from the drop-down menu.
- Under 'Edit Profile,' find and copy the permanent link address.
- Add the address as a link from your site or app. You can also send the link or its URL to your customers through invoices and other communications.
Test and Go Live
See our Test and Go Live guide to test the integration and configurations of your Hosted Checkout permanent link and to start transacting with an active production account.
Updated over 1 year ago
